Collatz Feather
This project is is a cover of Michael Spilsbury’s Collatz Feather, a visualization of the Collatz process. He was in turn inspired by visualizations from Edmund Harriss and Alex Bellos, and Patrick Scheibe.
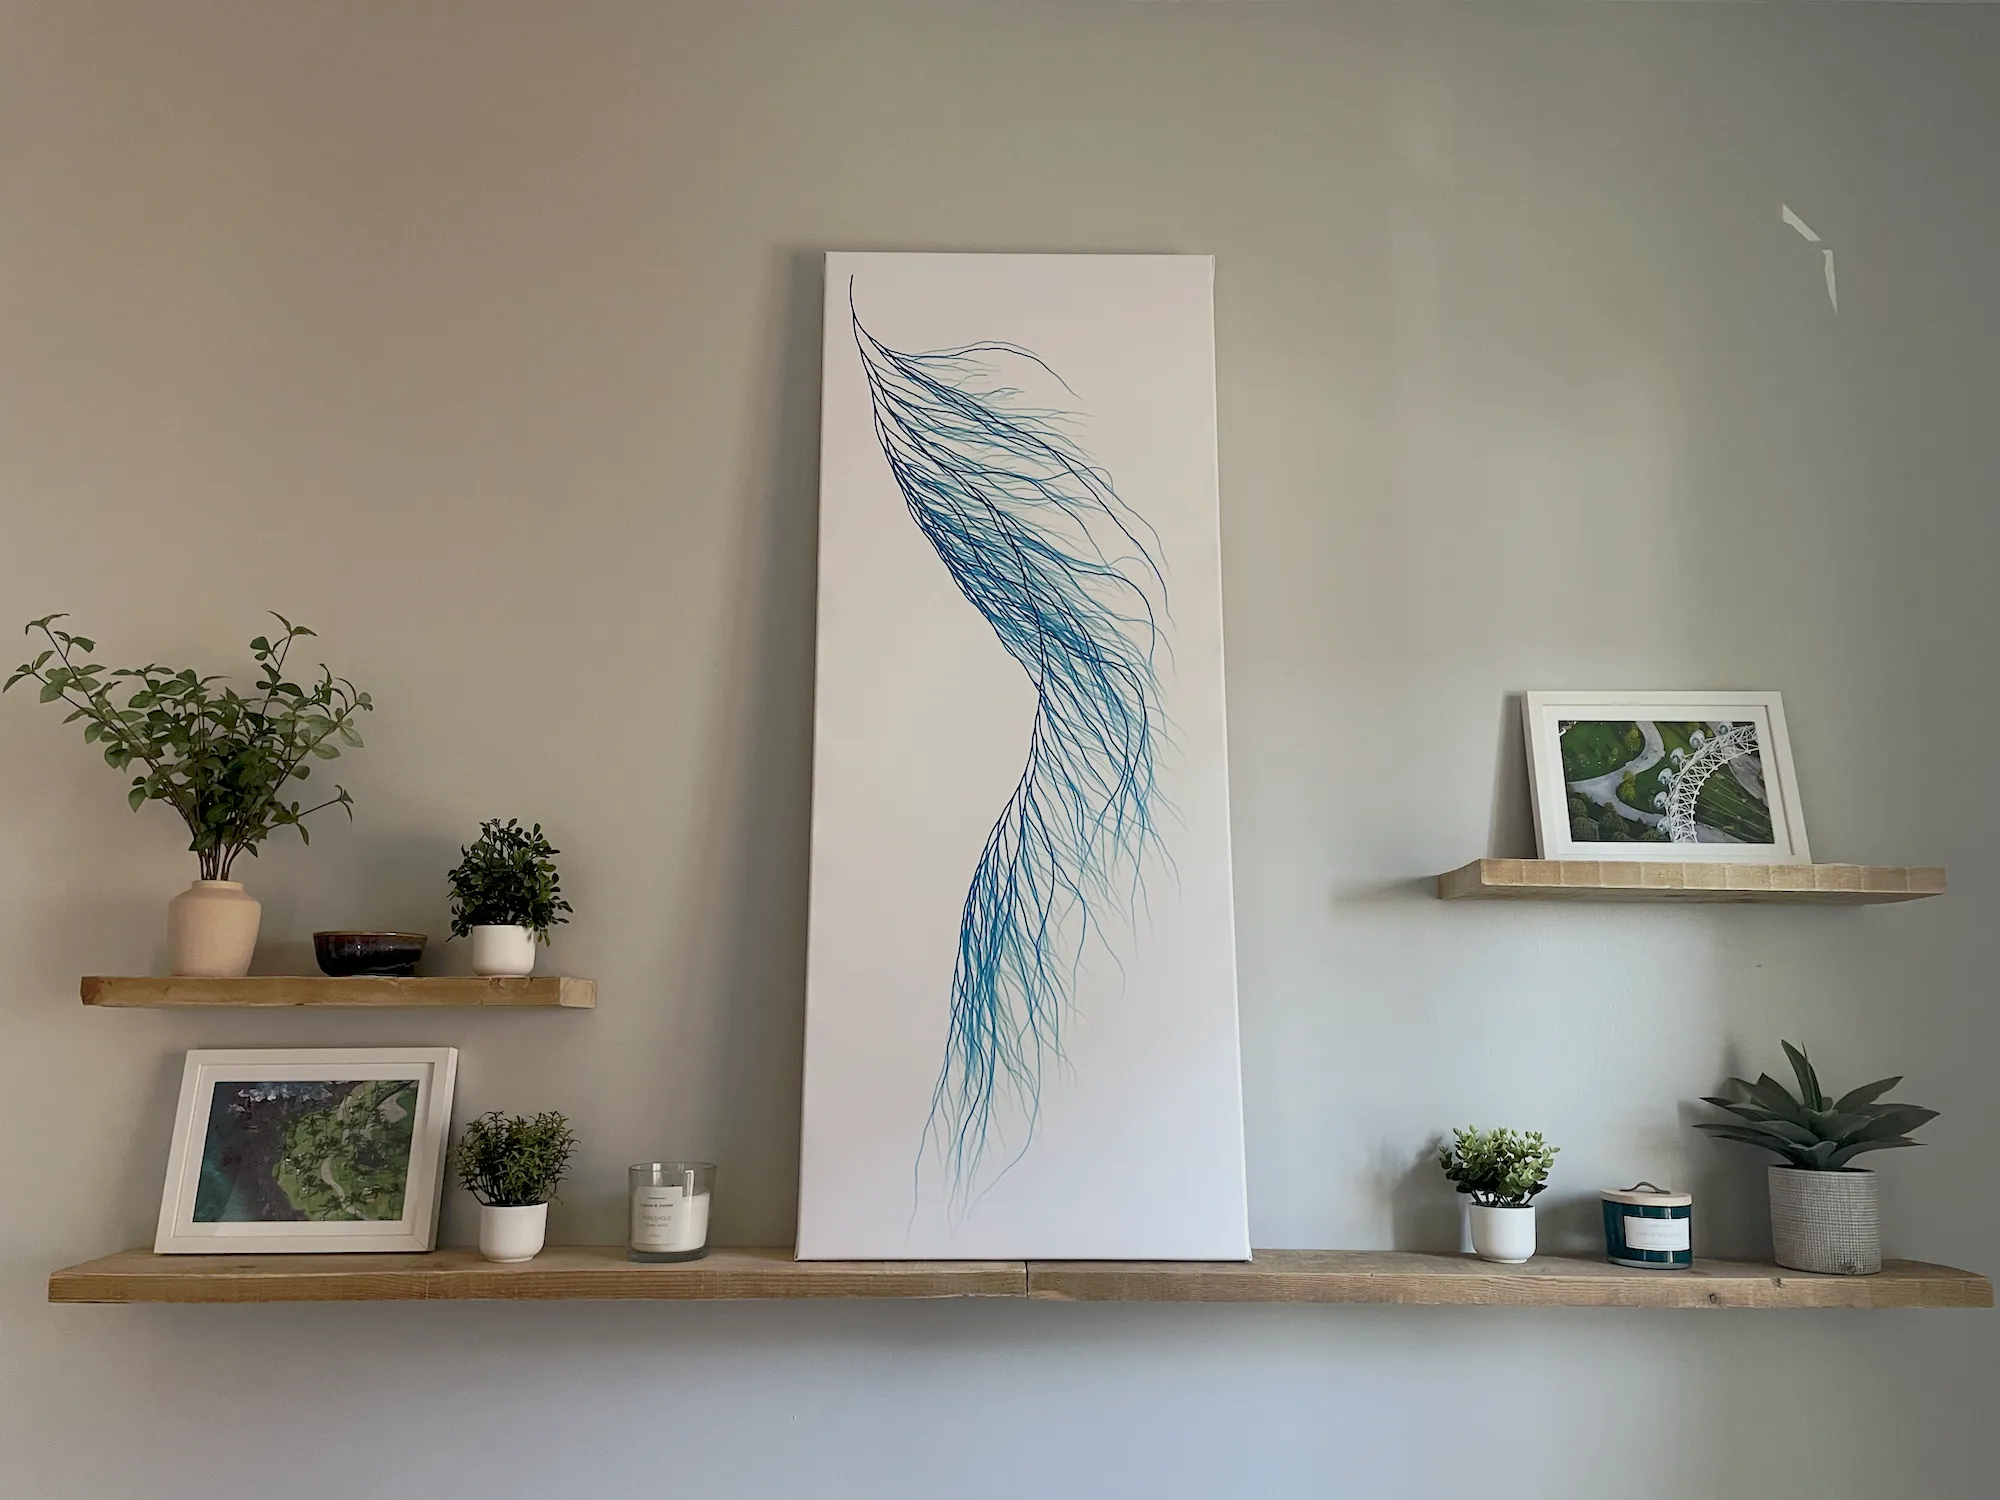
The end result is a 23x57 inch canvas that sits above my bed.
When I think about this project I marvel at
- how simple rules can give way to beautiful, complex, organic-looking results
- how that is a reflection of our world at large
- how the solutions to many small problems are still completely unknowable to us
I think this is a common theme for me. Searching for the beauty in (or creating beauty from) structure and determinism.
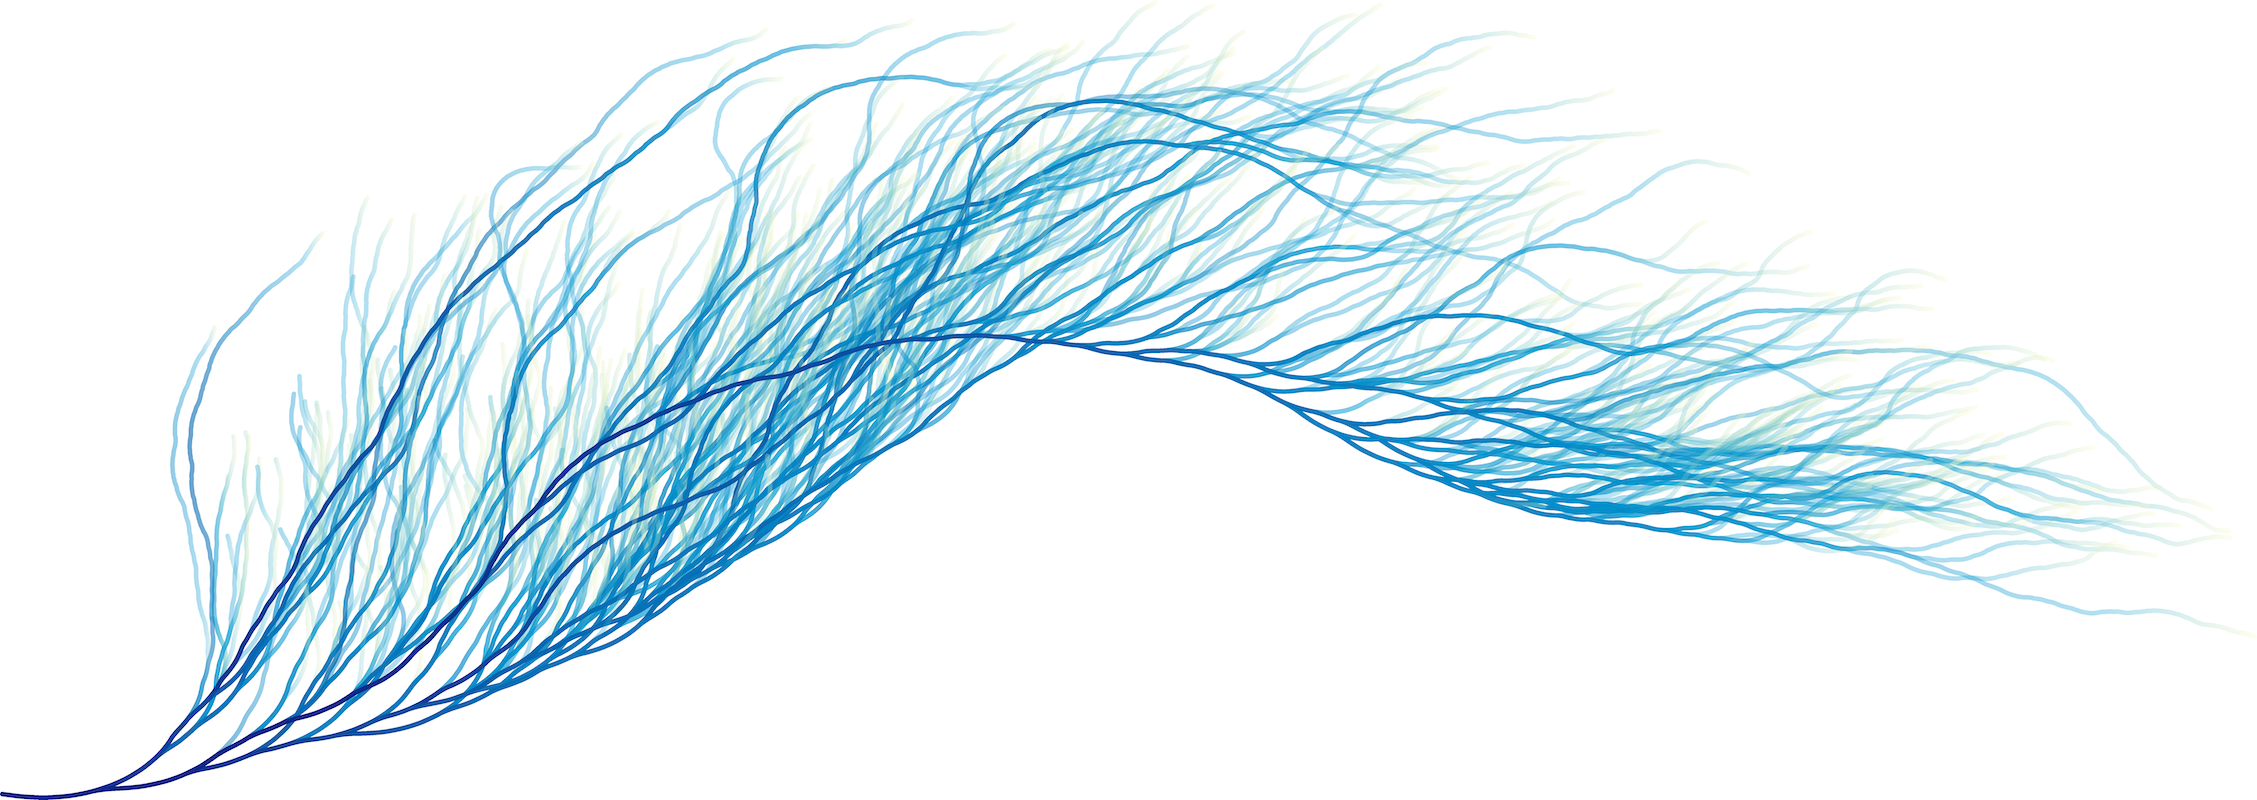
The Visualization
This is the core of the collatz process:
Take a number. If it’s even, divide it by two. If it’s odd, multiply it by three and add one.
The Collatz Conjecture is a guess that every number eventually reaches 1 when you keep repeating this process. Nobody has never found a starting number that doesn’t reach 1, but it is still possible that one exists!
Each strand in the feather is a single path from 1 (where all paths converge) to a random number somewhere out on the fringes of the feather. The numbers we visit along the way determine the length and angle of each little segment along the strand — parity determines angle, magnitude determines length.

I built a little interactive playground where you can tweak the parameters of the visualization and see how it affects the resulting image. Experiment with it here! Decreasing "segment length decay" and increasing "segment turn scale" leads to some extra chaotic, organic looking results. I recommend "along stroke" colorization for that kind of image.
Construction
When I came across Michael Spilsbury’s feather I was excited to make my own. I hope these details are helpful if you’re in the same boat.
Generating the image
I created this visualization using (nearly) the following Python code, derived from Patrick Scheibe’s Mathematica code linked above.
import cairo
import math
import random

segment_length_decay = 1.193
segment_length_scale = 18
segment_turn_scale = 0.179
segment_turn_bias = 0.715
start_angle = math.radians(-15)
start_x, start_y = (20, 480)
width, height = 1000, 500

def collatz(start):
    n = start
    path = []

    while n != 1:
        path.append(n)

        if n % 2 == 0:
            n = n // 2
        else:
            n = 3*n + 1

    return path

def set_gradient(ctx, end_x):
    grad = cairo.LinearGradient(start_x, height / 2.0, end_x, height / 2.0)

    grad.add_color_stop_rgba(0.0000, 14/255.0, 39/255.0, 134/255.0, 1.0)
    grad.add_color_stop_rgba(0.1369, 14/255.0, 39/255.0, 134/255.0, 1.0)
    grad.add_color_stop_rgba(0.9321, 0/255.0, 154/255.0, 210/255.0, 0.3)
    grad.add_color_stop_rgba(1.0000, 255/255.0, 251/255.0, 198/255.0, 0.3)

    ctx.set_source(grad)

def draw_path(ctx, path):
    angle = start_angle
    x, y = start_x, start_y
    points = []

    for n in reversed(path):
        d = segment_length_scale*(n / (1 + n**segment_length_decay))
        angle += segment_turn_scale * (segment_turn_bias - 2*(n % 2))
        x = x + d * math.cos(angle)
        y = y - d * math.sin(angle)
        points.append((x,y))

    set_gradient(ctx, points[-1][0])
    ctx.new_path()
    ctx.move_to(start_x, start_y)
    for point in points:
        ctx.line_to(*point)
    ctx.stroke()

def main():
    seed = random.randrange(10_000)
    random.seed(seed)

    print(f'Seed: {seed}')

    with cairo.SVGSurface("feather.svg", width, height) as surface:
        ctx = cairo.Context(surface)
        ctx.set_line_cap(cairo.LINE_CAP_ROUND)

        for _ in range(700):
            path = collatz(random.randrange(1, 1_000_000))
            draw_path(ctx, path)

main()
I like this little snippet in the code:
seed = random.randrange(10_000)
random.seed(seed)

print(f'Seed: {seed}')
This is a pattern I use frequently with generative art. It lets you generate a few different feathers, and if you like one in particular, you have the seed to keep experimenting with it (tweaking colors, etc) while keeping the shape.
Colorizing
I followed Michael’s process, writing a program to generate a black SVG and colorizing the image in Adobe Illustrator. Before writing this post I included linear colorization in the code above, so you can generate a similar image without owning Illustrator or knowing which buttons to click.
Printing
Once I had an SVG I was happy with I got it ready for printing. The first step here was adding a bit of margin around the image, making sure the space all around the feather was about the same. This can be done in code by adjusting the image size and start position, or in a free vector graphics program like Inkscape.
Then I converted the SVG to a PNG. I think I did this with Illustrator, but you can use Inkscape for this process as well. My final PNG was exported at 320 DPI. If you want the same settings, this means you should multiply your width and height in inches by 320 to get your export width and height in pixels.
I worked with Tartan Ink at CMU to print my image on canvas, and with the CMU Art Store to build a custom frame and stretch the canvas over it. I’m glad I planned with both groups at once, because I learned that I had to add a few additional inches of margin around the image for the edges of the canvas — these things are 3D! Overall this was a great (and cost-effective) experience. I would recommend working with local universities.
Reflection
This has been a multi-year project, initially prompted by the blank walls in my new apartment in 2022. It was my first foray into generative art, which I now consider a hobby of mine. And I followed in my mom’s footsteps here: most of our art at home was painted by her.
I’m grateful to Michael Spilsbury for sharing his work with the world and inspiring me to create something new, that I feel proud of. There’s something different and special about living with a piece you struggled with and for. And I like that when people ask about the piece, I have stories to tell.
When I look at the final product I think about
- how simple rules can give way to beautiful, complex, organic-looking results
- how that is a reflection of our world at large
- how the solutions to many small problems are still completely unknowable to us
I encourage you to create something that speaks to you!